本文主要介绍 Vue(2.x 版本)的基础使用方法,结合 ElementUI 和 Axios 可以快速搭建前端页面。
准备工作#
首先需要准备 node.js 环境,安装完成后查看环境是否正常:
1
2
3
4
|
➜ node -v
v16.18.1
➜ npm -v
9.8.1
|
之后就可以使用 npm 工具安装 Vue、ElementUI 以及 Axios:
1
2
3
4
5
|
➜ npm install vue -g
➜ npm install vue-cli -g  // 安装脚手架
➜ npm install vue-router
➜ npm install axios
➜ npm install element-ui -S
|
因为安装了脚手架工具,可以使用 vue ui 命令打开 Vue 项目管理器来创建 Vue 项目:
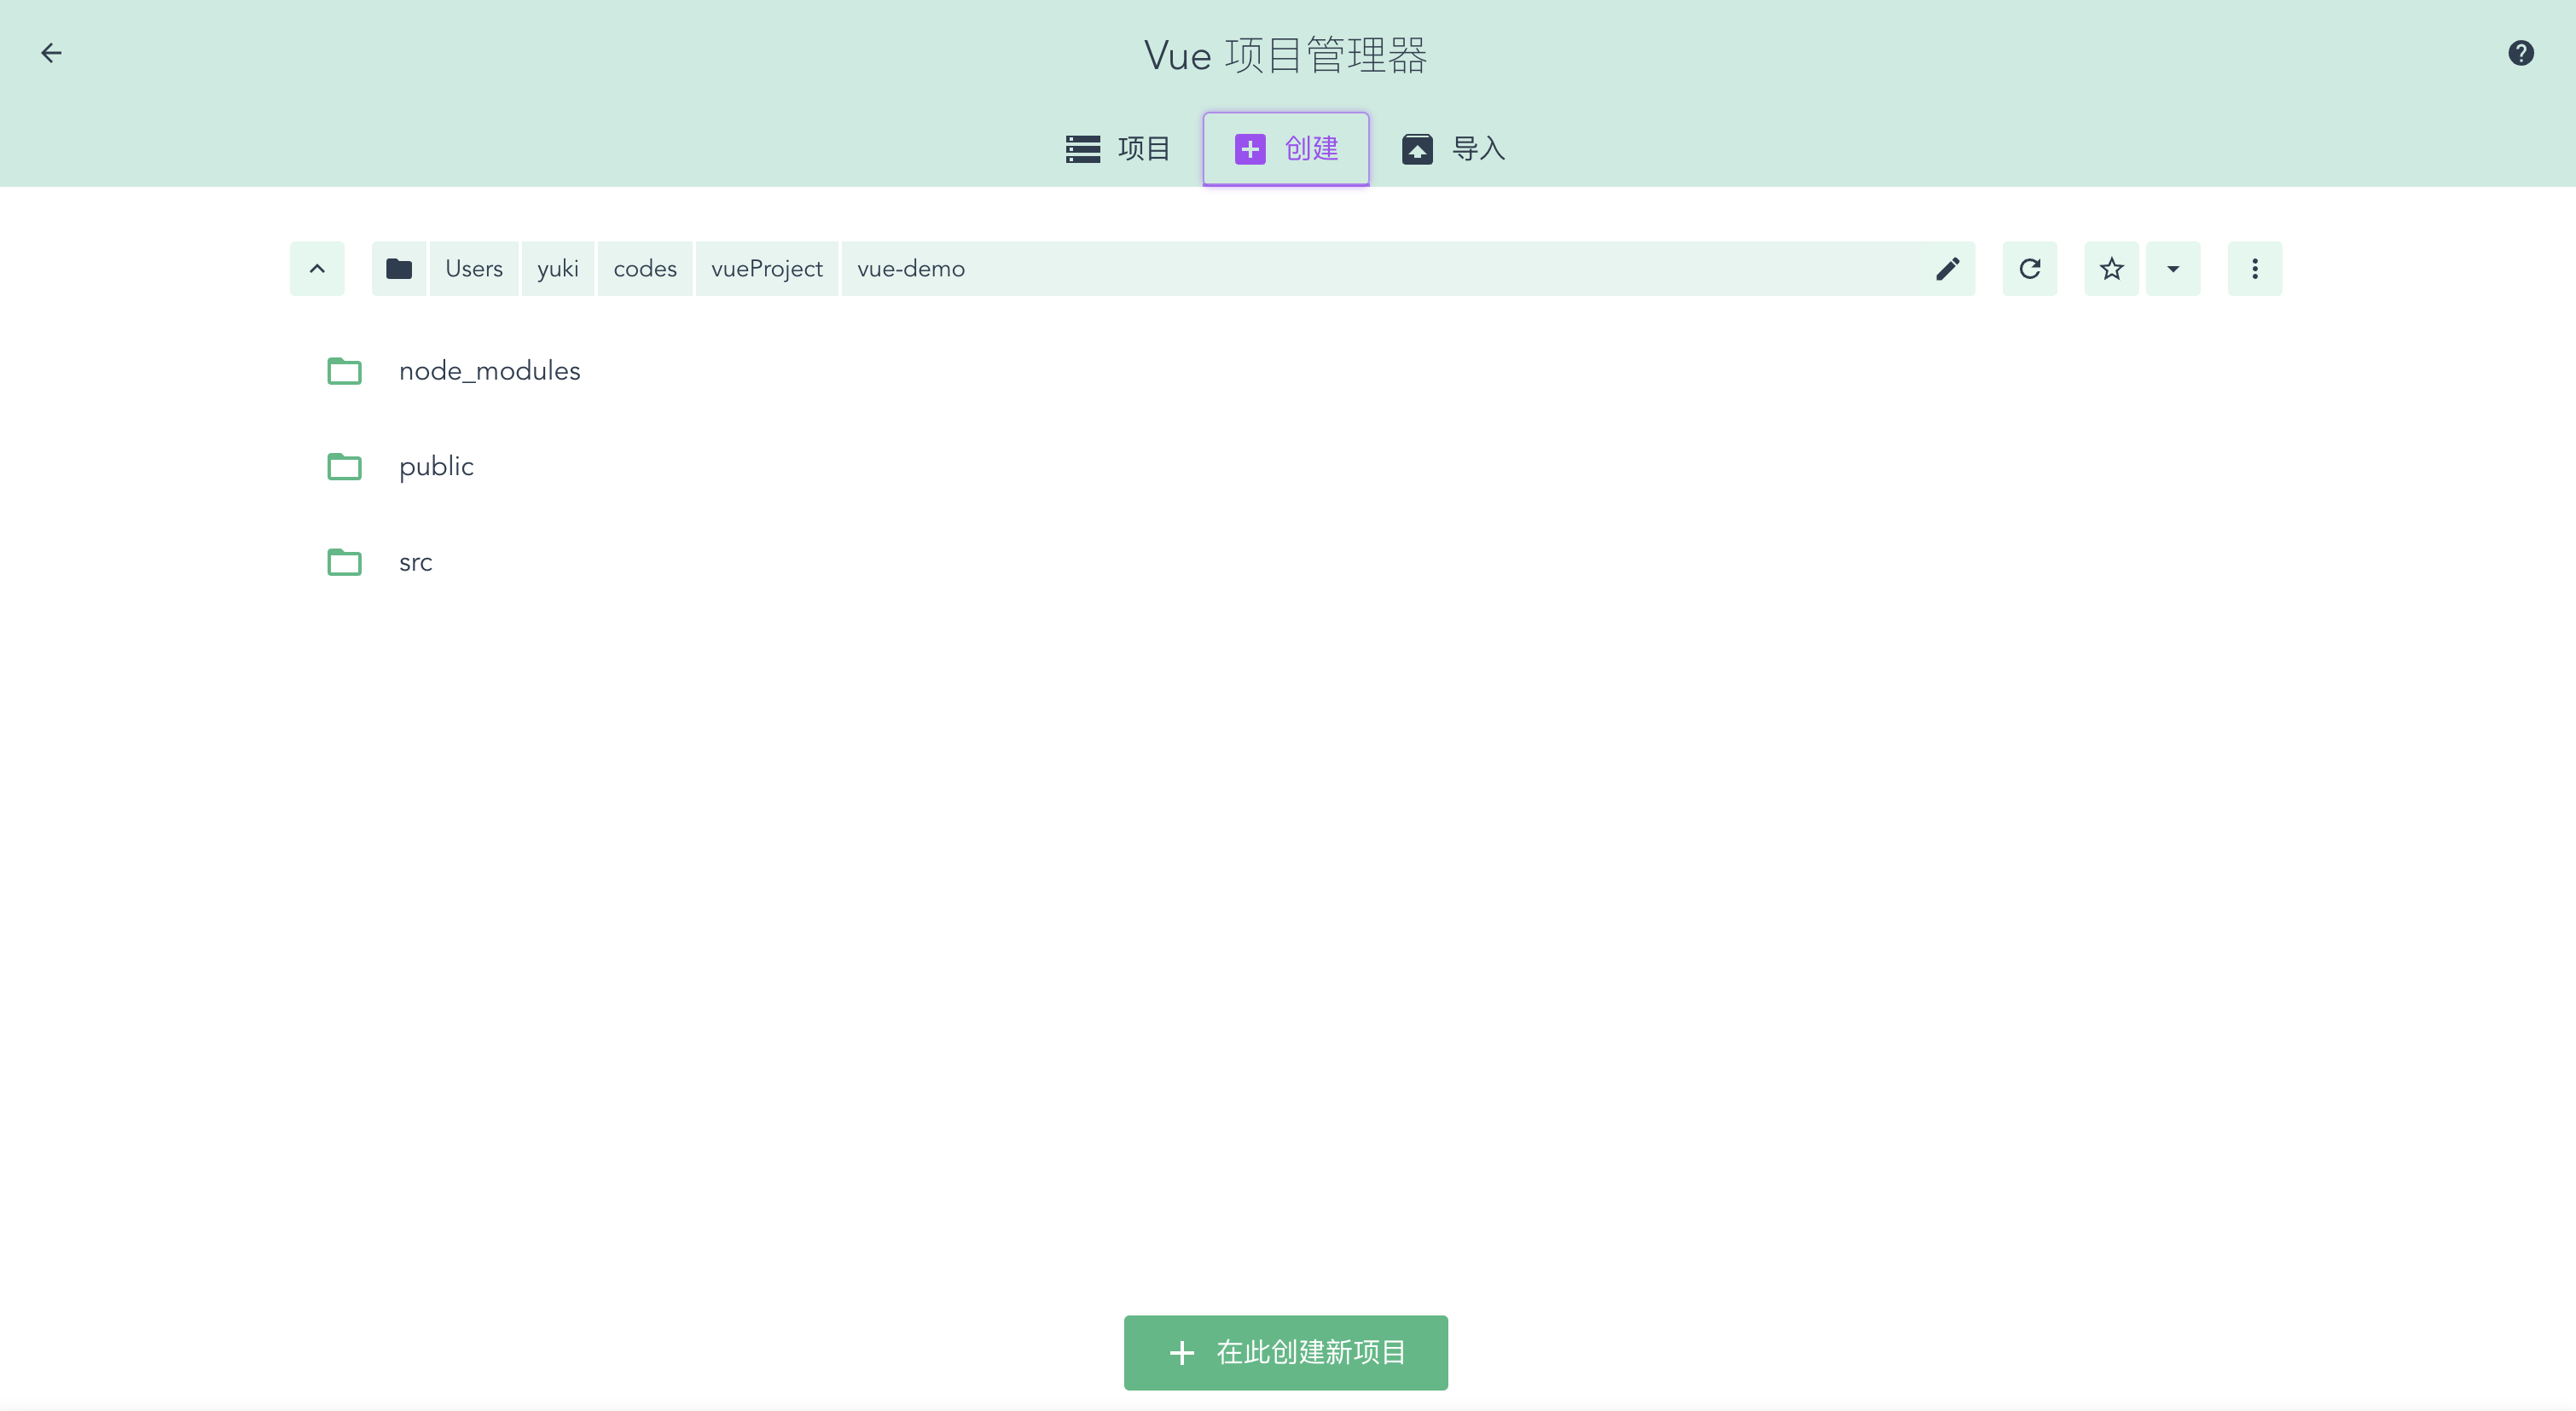 Vue 项目管理器
Vue项目介绍#
项目结构#
创建 Vue 项目成功后,我们可以看到项目的文件结构如下:
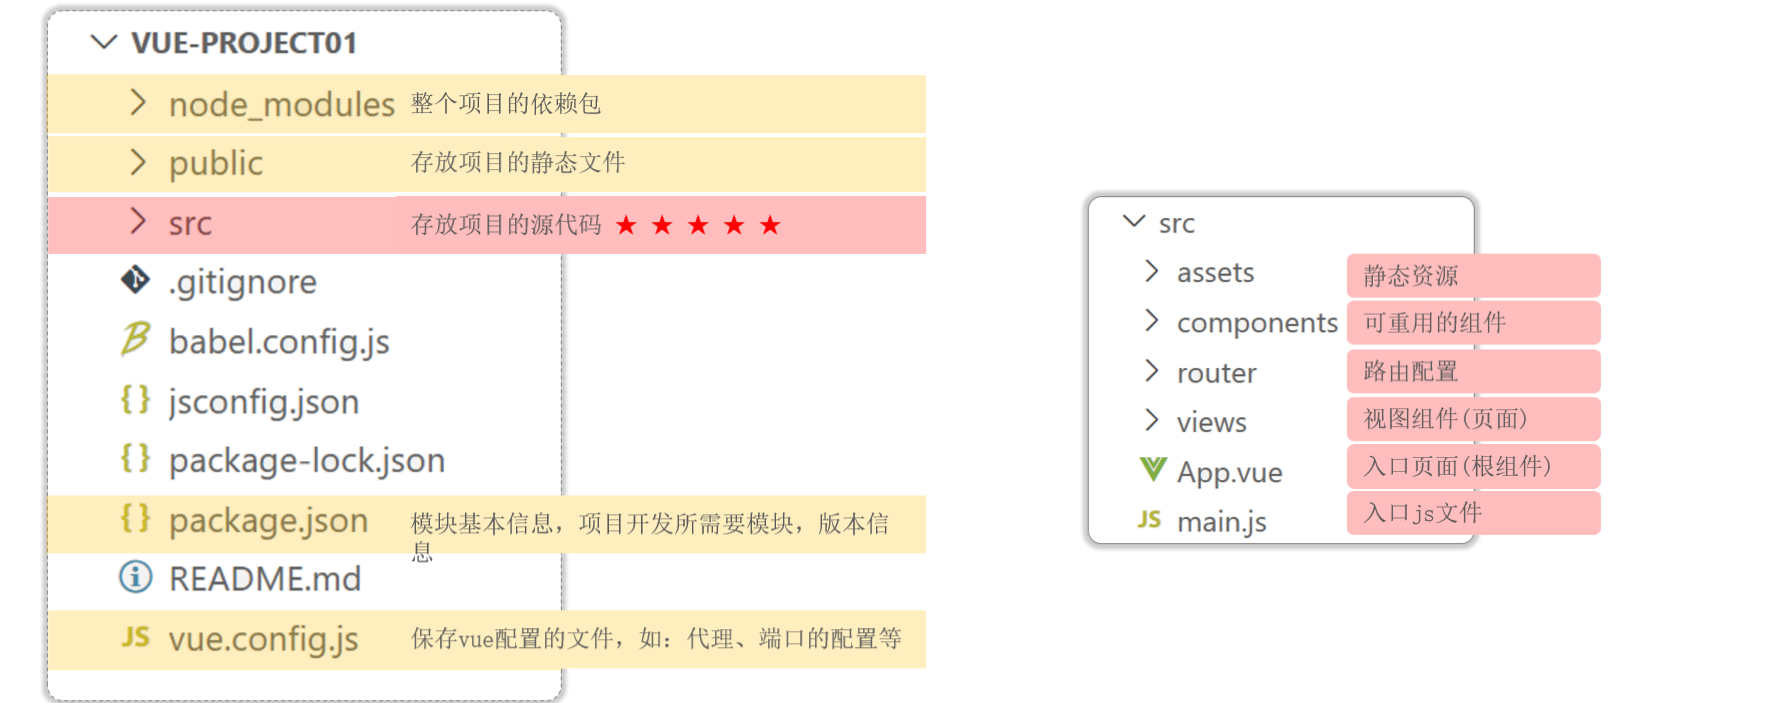 Vue 项目结构
启动项目#
在项目根目录下,控制台输入 npm run serve 即可启动项目,同时可以在 package.json 文件指定服务的端口号:
1
2
3
4
5
|
"scripts": {
    "serve": "vue-cli-service serve --port 12345 --open",
    "build": "vue-cli-service build",
    "lint": "vue-cli-service lint"
}
|
或者在 vue.config.js 文件中添加配置:
1
2
3
4
5
6
7
|
const { defineConfig } = require('@vue/cli-service')
module.exports = defineConfig({
  transpileDependencies: true,
  devServer: {
    port: 12345
  }
})
|
开发流程#
我们访问的首页是 index.html,但是打开 public/index.html 文件后发现代码很简洁,只有一个:
而浏览器所呈现的 index.html 内容却很丰富。这是因为 Vue 项目的 index.html 文件默认引入了入口函数 main.js 文件,其代码如下:
 1
 2
 3
 4
 5
 6
 7
 8
 9
10
|
import Vue from 'vue'
import App from './App.vue'
import router from './router'

Vue.config.productionTip = false

new Vue({
  router,
  render: h => h(App)
}).$mount('#app')
|
其中 $mount('#app') 将 Vue 对象创建的 dom 对象挂在到 id="app" 的标签区域中。
render: h => h(App) 中 render 是一个渲染函数,用于创建 HTML 模版。打开 App.vue,注意的是 .vue 结尾的都是 Vue 组件,而 Vue 的组件文件包含 3 个部分:
template: 模板部分,主要是 HTML 代码,用来展示页面主体结构;script: js 代码区域,主要是通过 js 代码来控制模板的数据来源和行为;style: css 样式部分,主要通过 css 样式控制模板的页面效果。
接下来我们可以简化模板部分内容,添加 script 部分的数据模型,删除 css 样式,完整代码如下:
 1
 2
 3
 4
 5
 6
 7
 8
 9
10
11
12
13
14
15
16
17
|
<template>
  <div id="app">
    {{ message }}
  </div>
</template>

<script>
export default {
  data() {
    return {
      "message": "hello world!"
    }
  }
}
</script>

<style></style>
|
使用ElementUI和Axios#
Element 是饿了么公司前端开发团队提供的一套基于 Vue 的网站组件库,用于快速构建网页。
Axios 是对原生的 AJAX 进行封装,用来发送异步请求。
前面已经介绍如何安装 ElementUI,然后我们需要在 main.js 这个入口文件中引入 ElementUI 的组件库,其代码如下:
 1
 2
 3
 4
 5
 6
 7
 8
 9
10
11
12
13
|
import Vue from 'vue'
import App from './App.vue'
import router from './router'
import ElementUI from 'element-ui';
import 'element-ui/lib/theme-chalk/index.css';

Vue.config.productionTip = false
Vue.use(ElementUI);

new Vue({
  router,
  render: h => h(App)
}).$mount('#app')
|
然后在 views 文件夹下创建 StudentView.vue,代码如下:
 1
 2
 3
 4
 5
 6
 7
 8
 9
10
11
12
13
14
15
16
17
18
|
<!-- 模版 -->
<template>
    <div></div>
</template>

<!-- 脚本 -->
<script>
export default {
    data() {
        return {
            "message": "hello world!"
        };
    }
}
</script>

<!-- 样式 -->
<style></style>
|
接下来我们要使用 ElementUI 写一个学生管理系统页面,需要注意的是,我们默认访问的是 App.vue 这个组件,此时我们需要修改成引入 student-view 这个组件,此时 App.vue 整体代码如下:
 1
 2
 3
 4
 5
 6
 7
 8
 9
10
11
12
13
14
15
16
17
18
|
<template>
  <div id="app">
    <student-view></student-view>
  </div>
</template>

<script>
import StudentView from './views/StudentView.vue';
export default {
  components: { StudentView },
  data() {
    return {
      "message": "hello world"
    };
  },
}
</script>
<style></style>
|
- 首先去 ElementUI 的 Container 布局容器找到合适的布局,粘贴到
StudentView.vue 组件的 template 模块中即可:
 1
 2
 3
 4
 5
 6
 7
 8
 9
10
|
<!-- 模版 -->
<template>
    <el-container>
        <el-header>Header</el-header>
        <el-container>
            <el-aside width="200px">Aside</el-aside>
            <el-main>Main</el-main>
        </el-container>
    </el-container>
</template>
|
同时设置 style:
代码
 1
 2
 3
 4
 5
 6
 7
 8
 9
10
11
12
13
14
15
16
17
18
19
20
21
22
23
24
25
26
27
28
29
30
31
32
33
34
35
36
37
38
39
40
41
|
<!-- 样式 -->
<style>
.el-container {
    height: 800px;
    border: 1px solid #eee
}

.el-header {
    background-color: #B3C0D1;
    color: #333;
    text-align: center;
    line-height: 60px;
}

.el-aside {
    background-color: #D3DCE6;
    color: #333;
    text-align: center;
    line-height: 200px;
}

.el-main {
    background-color: #E9EEF3;
    color: #333;
    text-align: center;
    line-height: 160px;
}

body>.el-container {
    margin-bottom: 40px;
}

.el-container:nth-child(5) .el-aside,
.el-container:nth-child(6) .el-aside {
    line-height: 260px;
}

.el-container:nth-child(7) .el-aside {
    line-height: 320px;
}
</style>
|
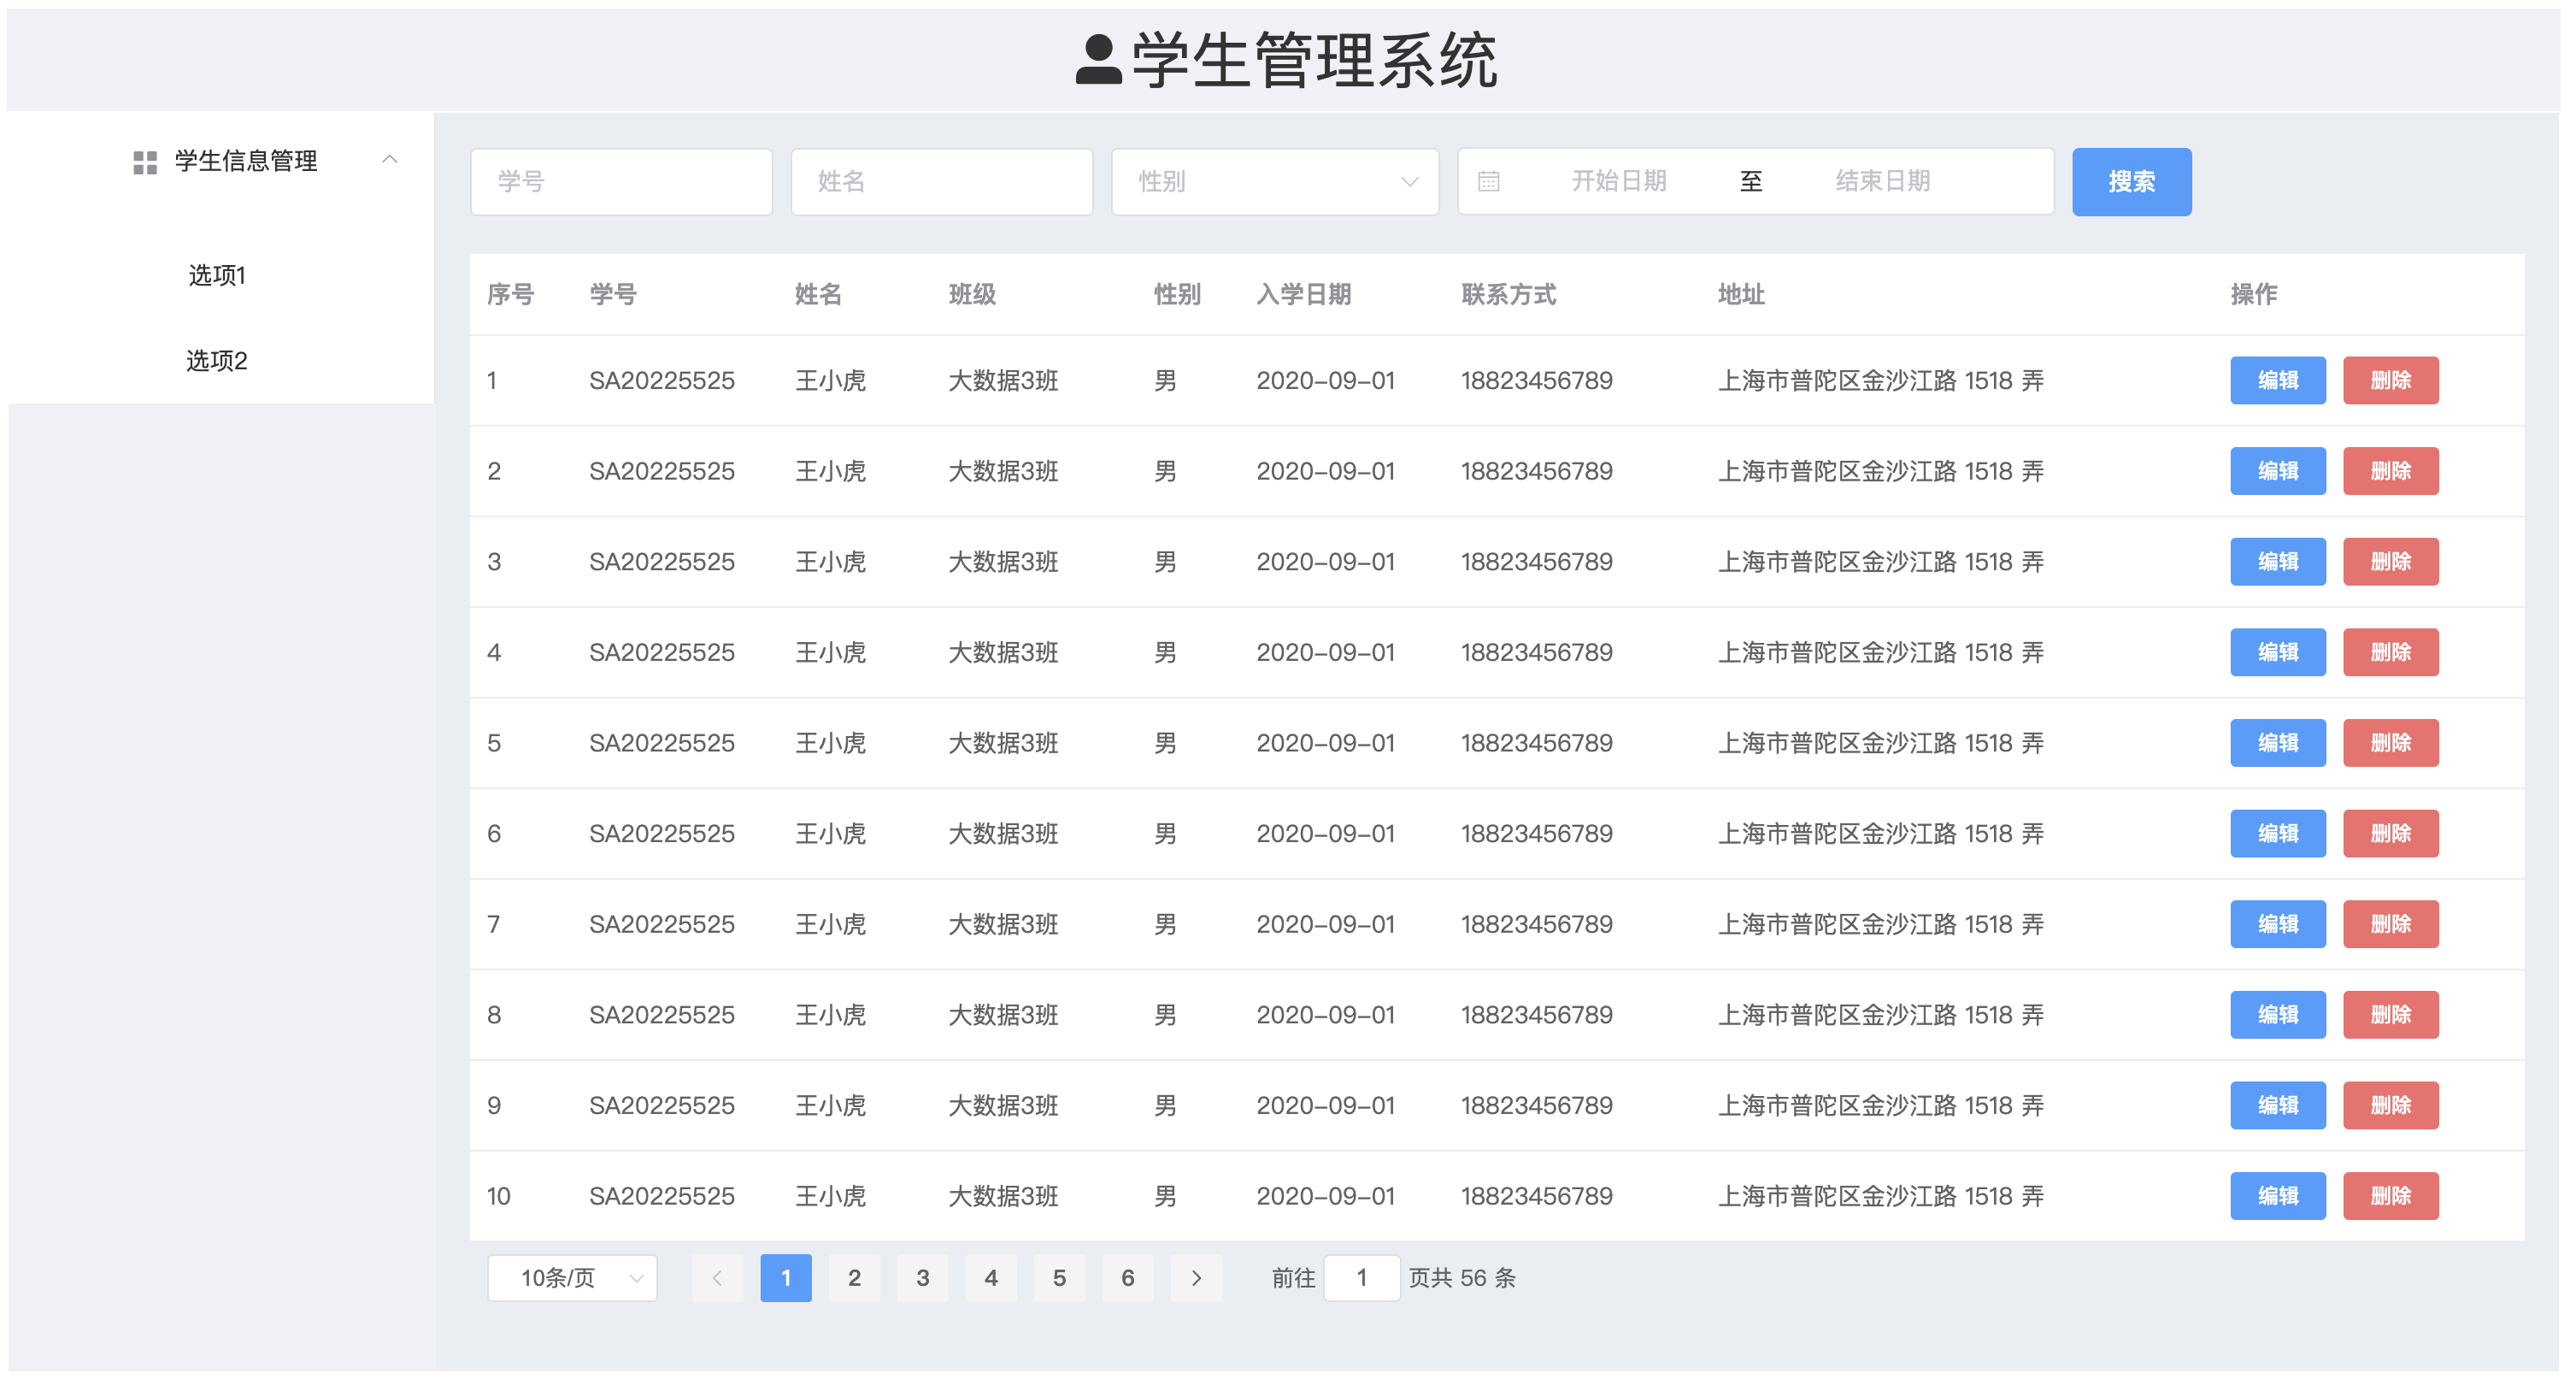
- 设置 Header、Aside、Main 的布局,完成后的布局如下:
 布局展示-1
代码
  1
  2
  3
  4
  5
  6
  7
  8
  9
 10
 11
 12
 13
 14
 15
 16
 17
 18
 19
 20
 21
 22
 23
 24
 25
 26
 27
 28
 29
 30
 31
 32
 33
 34
 35
 36
 37
 38
 39
 40
 41
 42
 43
 44
 45
 46
 47
 48
 49
 50
 51
 52
 53
 54
 55
 56
 57
 58
 59
 60
 61
 62
 63
 64
 65
 66
 67
 68
 69
 70
 71
 72
 73
 74
 75
 76
 77
 78
 79
 80
 81
 82
 83
 84
 85
 86
 87
 88
 89
 90
 91
 92
 93
 94
 95
 96
 97
 98
 99
100
101
102
103
104
105
106
107
108
109
110
111
|
<!-- 模版 -->
<template>
    <el-container>
        <!-- 顶栏 -->
        <el-header style="font-size:36px;background-color: #eff1f8">
            <el-row>
                <el-col :span="24">
                    <div class="grid-content bg-purple-dark"><i class="el-icon-user-solid" color="white"></i>学生管理系统</div>
                </el-col>
            </el-row>
        </el-header>

        <el-container>
            <!-- 导航栏 -->
            <el-aside width="250px" style="background-color: rgb(238, 241, 246)">
                <el-menu :default-openeds="['1']">
                    <el-submenu index="1">
                        <template slot="title"><i class="el-icon-menu"></i>学生信息管理</template>
                        <el-menu-item-group>
                            <el-menu-item index="1-1">选项1</el-menu-item>
                            <el-menu-item index="1-2">选项2</el-menu-item>
                        </el-menu-item-group>
                    </el-submenu>
                </el-menu>
            </el-aside>

            <!-- 表格 -->
            <el-main>
                <el-table :data="tableData">
                    <el-table-column prop="id" label="序号" width="60">
                        <template slot-scope="scope">
                            <span>{{ (pageNum - 1) * pageSize + scope.$index + 1 }}</span>
                        </template>
                    </el-table-column>
                    <el-table-column prop="no" label="学号" width="150"></el-table-column>
                    <el-table-column prop="name" label="姓名" width="120"></el-table-column>
                    <el-table-column prop="class" label="班级" width="150"></el-table-column>
                    <el-table-column prop="gender" label="性别" width="60"></el-table-column>
                    <el-table-column prop="entryDate" label="入学日期" width="150"></el-table-column>
                    <el-table-column prop="contact" label="联系方式" width="180"></el-table-column>
                    <el-table-column prop="address" label="地址" width="300"></el-table-column>
                </el-table>
            </el-main>
        </el-container>
    </el-container>
</template>

<!-- 脚本 -->
<script>
export default {
    data() {
        const item = {
            no: 'SA20225525',
            name: '王小虎',
            class: '大数据3班',
            gender: 1,
            entryDate: '2020-09-01',
            contact: '18823456789',
            address: '上海市普陀区金沙江路 1518 弄',
        };
        return {
            pageNum: 1,
            pageSize: 10,
            tableData: Array(10).fill(item)
        }
    }
}
</script>

<!-- 样式 -->
<style>
.el-container {
    height: 800px;
    border: 1px solid #ffffff;
}

.el-header {
    background-color: #B3C0D1;
    color: #333;
    text-align: center;
    line-height: 60px;
}

.el-aside {
    background-color: #D3DCE6;
    color: #333;
    text-align: center;
    line-height: 200px;
}

.el-main {
    background-color: #E9EEF3;
    color: #333;
    text-align: center;
    padding: 0;
}

body>.el-container {
    margin-bottom: 40px;
}

.el-header {
    background-color: #B3C0D1;
    color: #333;
    line-height: 60px;
}

.el-aside {
    color: #333;
}
</style>
|
js 脚本中的 data() 函数与模版进行了双向数据绑定,我们可以在 HTML 代码中引用 data() 函数的返回值。
添加控件#
接下来我们为页面添加搜索和分页控件,从 ElementUI 官网找到对应的控件粘贴到模版里,并且在脚本部分建立对应的数据模型,此时页面样式和对应的代码如下:
 布局展示-2
代码
  1
  2
  3
  4
  5
  6
  7
  8
  9
 10
 11
 12
 13
 14
 15
 16
 17
 18
 19
 20
 21
 22
 23
 24
 25
 26
 27
 28
 29
 30
 31
 32
 33
 34
 35
 36
 37
 38
 39
 40
 41
 42
 43
 44
 45
 46
 47
 48
 49
 50
 51
 52
 53
 54
 55
 56
 57
 58
 59
 60
 61
 62
 63
 64
 65
 66
 67
 68
 69
 70
 71
 72
 73
 74
 75
 76
 77
 78
 79
 80
 81
 82
 83
 84
 85
 86
 87
 88
 89
 90
 91
 92
 93
 94
 95
 96
 97
 98
 99
100
101
102
103
104
105
106
107
108
109
110
111
112
113
114
115
116
117
118
119
120
121
122
123
124
125
126
127
128
129
130
131
132
133
134
135
136
137
138
139
140
141
142
143
144
145
146
147
148
149
150
151
152
153
154
155
156
157
158
159
160
161
162
163
164
165
166
167
168
169
170
171
172
173
174
175
176
177
178
179
180
181
182
183
184
185
186
187
|
<!-- 模版 -->
<template>
    <el-container>
        <!-- 顶栏 -->
        <el-header style="font-size:36px;background-color: #eff1f8">
            <el-row>
                <el-col :span="24">
                    <div class="grid-content bg-purple-dark"><i class="el-icon-user-solid" color="white"></i>学生管理系统</div>
                </el-col>
            </el-row>
        </el-header>

        <el-container>
            <!-- 导航栏 -->
            <el-aside width="250px" style="background-color: rgb(238, 241, 246)">
                <el-menu :default-openeds="['1']">
                    <el-submenu index="1">
                        <template slot="title"><i class="el-icon-menu"></i>学生信息管理</template>
                        <el-menu-item-group>
                            <el-menu-item index="1-1">选项1</el-menu-item>
                            <el-menu-item index="1-2">选项2</el-menu-item>
                        </el-menu-item-group>
                    </el-submenu>
                </el-menu>
            </el-aside>

            <!-- 表格 -->
            <el-main>
                <!-- 搜索栏 -->
                <el-form :inline="true" :model="searchForm" label="left" class="searchForm">
                    <el-form-item>
                        <el-input v-model="searchForm.no" placeholder="学号"></el-input>
                    </el-form-item>
                    <el-form-item>
                        <el-input v-model="searchForm.name" placeholder="姓名"></el-input>
                    </el-form-item>
                    <el-form-item>
                        <el-select v-model="searchForm.gender" placeholder="性别">
                            <el-option label="男" value="1"></el-option>
                            <el-option label="女" value="0"></el-option>
                        </el-select>
                    </el-form-item>
                    <el-form-item>
                        <el-date-picker v-model="searchForm.entryDate" type="daterange" range-separator="至"
                            start-placeholder="开始日期" end-placeholder="结束日期">
                        </el-date-picker>
                    </el-form-item>
                    <el-form-item>
                        <el-button type="primary" @click="onSearchStudent">搜索</el-button>
                    </el-form-item>
                </el-form>
                <!-- 表格 -->
                <el-table :data="tableData" style="width: 100%;">
                    <el-table-column type="index" label="序号" width="60"></el-table-column>
                    <!-- <el-table-column prop="id" label="序号" width="60">
                        <template slot-scope="scope">
                            <span>{{ (pageNum - 1) * pageSize + scope.$index + 1 }}</span>
                        </template>
                    </el-table-column> -->
                    <el-table-column prop="no" label="学号" width="120"></el-table-column>
                    <el-table-column prop="name" label="姓名" width="90"></el-table-column>
                    <el-table-column prop="class" label="班级" width="120"></el-table-column>
                    <el-table-column prop="gender" label="性别" :formatter="genderFormate" width="60">
                    </el-table-column>
                    <el-table-column prop="entryDate" label="入学日期" width="120"></el-table-column>
                    <el-table-column prop="contact" label="联系方式" width="150"></el-table-column>
                    <el-table-column prop="address" label="地址" width="300"></el-table-column>
                    <el-table-column label="操作">
                        <el-button type="primary" size="mini" @click="onEditStudent">编辑</el-button>
                        <el-button type="danger" size="mini" @click="onDeleteStudent">删除</el-button>
                    </el-table-column>
                </el-table>

                <!-- Pagination分页 -->
                <el-pagination @size-change="handleSizeChange" @current-change="handleCurrentChange" background
                    layout="sizes, prev, pager, next, jumper, total" :total="pageForm.total">
                </el-pagination>
            </el-main>
        </el-container>
    </el-container>
</template>

<!-- 脚本 -->
<script>
export default {
    data() {
        const item = {
            'no': 'SA20225525',
            'name': '王小虎',
            'class': '大数据3班',
            'gender': 1,
            'entryDate': '2020-09-01',
            'contact': '18823456789',
            'address': '上海市普陀区金沙江路 1518 弄',
        };
        return {
            pageNum: 1,
            pageSize: 10,
            tableData: Array(10).fill(item),
            genderFormate(row) {
                if (row.gender == 1) return "男"
                else if (row.gender == 0) return "女"
                else return "未知"
            },
            // 搜索栏
            searchForm: {
                'no': '',
                'name': '',
                'gender': '',
                'entryDate': '',
            },
            // 分页
            pageForm: {
                total: 56,
            }
        }
    },
    methods: {
        // 搜索
        onSearchStudent() {
            console.log("搜索");
        },
        // 分页
        handleSizeChange(val) {
            console.log(`每页 ${val} 条`);
        },
        handleCurrentChange(val) {
            console.log(`当前页: ${val}`);
        },
        // 编辑
        onEditStudent() {

        },
        // 删除
        onDeleteStudent() {

        }
    },
}
</script>

<!-- 样式 -->
<style>
.el-container {
    height: 800px;
    border: 1px solid #ffffff;
}

.el-header {
    background-color: #B3C0D1;
    color: #333;
    text-align: center;
    line-height: 60px;
}

.el-aside {
    background-color: #D3DCE6;
    color: #333;
    text-align: center;
    line-height: 200px;
}

.el-main {
    background-color: #E9EEF3;
    color: #333;
    text-align: left;
    padding: 0;
}

body>.el-container {
    margin-bottom: 40px;
}

.el-header {
    background-color: #B3C0D1;
    color: #333;
    line-height: 60px;
}

.el-aside {
    color: #333;
}

.el-pagination {
    margin-top: 5px;
}
</style>
|
使用Axios#
TODO:
Vue路由#
在 src/router/index.js 文件中定义路由表,根据其提供的模板代码进行修改,最终代码如下:
 1
 2
 3
 4
 5
 6
 7
 8
 9
10
11
12
13
14
15
16
17
18
19
20
21
22
23
24
25
26
27
28
29
|
import Vue from 'vue'
import VueRouter from 'vue-router'
import StudentView from '../views/StudentView.vue'
import AboutView from '../views/AboutView.vue'

Vue.use(VueRouter)

const routes = [
  {
    path: '/',
    redirect: '/student',  // 首页重定向
  },
  {
    path: '/about',
    name: 'about',
    component: AboutView
  },
  {
    path: '/student',
    name: 'student',
    component: StudentView
  }
]

const router = new VueRouter({
  routes
})

export default router
|
此时,由于使用的是路由的方式控制页面跳转,所以 App.vue 页面更改为:
 1
 2
 3
 4
 5
 6
 7
 8
 9
10
11
12
|
<template>
  <div id="app">
    <!-- 使用路由 -->
    <router-view></router-view>
  </div>
</template>

<script>
export default {
}
</script>
<style></style>
|
StudentView.vue 的导航栏绑定路由:
 1
 2
 3
 4
 5
 6
 7
 8
 9
10
11
12
|
<!-- 导航栏 -->
<el-aside width="250px" style="background-color: rgb(238, 241, 246)">
    <el-menu :default-openeds="['1']">
        <el-submenu index="1">
            <template slot="title"><i class="el-icon-menu"></i>学生信息管理</template>
            <el-menu-item-group>
                <el-menu-item index="1-1"><router-link to="/student">学生基本信息</router-link></el-menu-item>
                <el-menu-item index="1-2"><router-link to="/about">关于</router-link></el-menu-item>
            </el-menu-item-group>
        </el-submenu>
    </el-menu>
</el-aside>
|
打包部署#
前端工程开发后可以通过nginx服务器发布前端工程。